Thursday, October 29, 2009

Established Board - $12


We've seen our fair share of personalized family signs, but this is definitely our favorite! We love the way we can give it that weathered look with the routering and how the two upholstery tacks add just the right amount of bling! Wouldn't this be a great gift?

We're doing this board in November for one of our classes.

$12 for the Class (includes everything)
$9 for the Kit (does not include paint, stain, brushes, sandpaper, sealer)
$5 for the Vinyl only

If you're interested, let us know and we can work out a date that's good for you! Also, keep checking the blog. We've got a few cute projects coming down the pipeline!

Sunday, October 25, 2009

Whoo-Hoo! We were featured!


A big thanks to Valerie at "The Crafters File Box" for featuring our Halloween Luminaries! If you haven't been to her site yet, check it out! She finds great projects and "files" the ideas away for the future. Have fun browsing!

Saturday, October 24, 2009

Sew Cute!


I {heart} this pillow. That's all I need to say. Thanks to Cluck Cluck Sew for this creative way to use fabric scraps.

Thursday, October 22, 2009

Halloween Luminaries


We're going to start adding our frugal ideas to the blog listed under "Cheap Trick." I know, I know... now you're all singing "I Want You To Want Me...." ;) Great song. But, from now on when you hear the words "Cheap Trick," we want you to get SO EXCITED because you are about to see one heck of an idea for hardly any $$$. It doesn't get much better than that!

Here's one that I came up with a few years ago when we were a poor medical student + family. Not much has changed since then...now it's just the poor medical resident + family.


But, even if we ran into a truck full of money tomorrow, I would still do my halloween luminaries. They take very little time to make, cost hardly anything, and take up very little space in storage. Have you noticed that the storage part is important to me?


The hardest part for me was googling "Spider Clip Art" to find the pictures for this project. Ugh. I'm still a little creeped out and I made these 3 years ago! Anyway, I printed little sayings (such as "Scared?" or "Turn Back Now") with spider pictures onto white cardstock. Then I folded the printed cardstock so that it would fit onto the outside of a white paper bag, taped it on, and then taped a blank folded white cardstock to the back.


Add some tealights & sand (or dirt if you're dirt cheap like me) - and WHA-LAH! You've created a spooky little walk to your front door for trick-or-treaters. Every year I get TONS of comments on these and they are just so easy. Hope you like 'em! Do you have any "Cheap Tricks" you'd like to share? Can't wait to hear from you.

Saturday, October 17, 2009

Hostess with the Mostess

Thanks so much to all of the ladies at Friday night's craft class! It was such a blast and we hope you had a great time. After such a great turnout, we decided that we wanted to have some kind of reward for people that host our craft classes. So, we came up with a hostess reward program similar to any home party company. Because, after all, who doesn't like free stuff?!?

Craft Classes
We know how much fun it can be to get together with friends and family to make affordable crafts, but sometimes the hassle takes all of the fun out of it. You won't believe how easy we make it to have a craft night! We will teach your craft class at the place of your choice (our home, your home, etc) and provide everything for the projects (paint, brushes, glue, etc). We only ask that you have 5 projects to work on (you can have 3 people doing 5 projects and that's just fine).

Hostess Rewards
We base your hostess rewards on the dollar amount of projects purchased for your class. Even craft kits and custom vinyl for people not in attendance can go towards your total! If your total is $150 or more, you earn 10% of free products (i.e. $200 class earns $20 worth of free products). You can use that credit to purchase crafts, kits, and custom vinyl. Also, for every guest at your class who books their own class, you receive one half-price item.

Thanks to everyone for your interest! We only started a month ago and we are so excited for the future. This hostess program is our little way to start saying THANKS! We couldn't do it without you!

Wednesday, October 14, 2009

Boo!


What is it about Burlap that makes me think of fall? I love these two projects! If you have some fabric laying around, they'd be pretty easy to make...and cheap to boot! Thanks to Everyday Chaos and La.T.Da for these great ideas!

Monday, October 12, 2009

Autumn Blocks - $15


Aren't these darling? These cute little blocks spice up the season in such a fun way!

The ribbon and bows add just the right touch, don't they?

Let us know if you'd like to make these at showmecrafts@gmail.com.

Friday, October 9, 2009

Got Candy?


How fun is this? I'm not sure it would look this good on my mantle (the clock and everything else really add to the complete look - so cute!), but I can totally see this hanging up in our where we normally hang our birthday sign. Thanks to "The Polkadot Chair" for this great idea!

Tuesday, October 6, 2009

Gratitude Tree


Our family started a tradition a few years ago to sit down during our weekly family nights in November and write down some of the things we're grateful for. Last year I announced to my two little girls that I was grateful to have a baby in my belly. I will never forget the looks on their faces!

In the past, we would simply write our ideas down on leaves and put them on our kitchen wall. Well, this year I decided to "kick it up a notch," as Emeril would say. I took branches from outside, placed them into floral foam in a pot, and covered the foam with beans. Then I bought some tags from Wally World and started our tree.

We can't wait to fill it up - we have so much to be thankful for! It’s always fun to hear what my kids think up. Sometimes it’s “yummy food” or “fun toys.” But my five-year-old daughter came up with my favorite tag so far this year:

She’s a hoot! We also plan on keeping the tags from year to year, so we put the year on the back:

The tree looked a little lonely sitting there, so I thought I'd make a sign to go with it.


I think this chipboard tag sign adds just the right touch! I originally had ribbon on top of each tag, but I think it was a little overkill. I wanted people to notice the word GRATITUDE, not the swirls of ribbon surrounding it.

So, what’s my favorite part of this project? If you’re like me, you have boxes and boxes of holiday decorations. Those bulky items are a pain to haul around and cumbersome to store. Just imagine the small amount of space it will take to store this baby! I love it!


So, here’s how to make the sign. You’ll need:

Chipboard

Scissors

Scrapbook Paper

Ribbon (two pieces - at least 40” each)

Hot Glue

Hole Punch

Adhesive (I used Mod Podge – you can use whatever you prefer)

Letters (I used vinyl letters – again, use whatever you prefer)

*Optional - One Office Tag (measures 2-5/8” wide x 5-1/4” tall)


I started with an office tag for a template and cut out 9 chipboard tags.

I found some paper I loved at Hobby Lobby called “Della Fantasia” by The Paper Studio. It’s classy and yet, has just enough personality to make sure the sign wasn’t boring. It’s tricky to find that balance, know what I mean?

Now you have to decide how particular you are about crafts. This project could be done the easy way or the hard way. The difference? Showing off your backside.

Easy Way

This way takes WAY less time, but you can see the ribbon & glue from behind.


Hard Way

This way is a little more difficult, but looks gorgeous any way you look at it.

Basically, are you a Martha? Martha Stewart would never, ever show off her backside (thank goodness). If you are a Martha, skip this next step and move on to lining up the tags. If you don’t mind showing your rear off, simply glue scrapbook paper to the tag. As you can see, it still looks great from the front & side.

Next, line up the tags as straight as possible. I separated the tags by about 1/4” so that they would fold up nicely. Glue one piece of ribbon to the top of the tags and one to the bottom (about 2-1/2” apart). A word of caution: Don’t skimp and do just one ribbon! It needs two ribbons to keep it from falling over. I learned the hard way on that one. ;)

If you chose the easy way – you’re almost finished! Just add your letters. I told you it was simple! If you’re a little more particular, like me, let’s keep going. Take your scrapbook paper and cut some 2-5/8” x 12” strips. Match up one side of your strip to the bottom of your tag and fold it over. Repeat for each tag.

Now glue start gluing. I started with the smallest portion on the bottom of the backside.

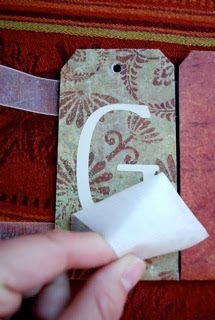
When you glue the front, make sure to smooth out any bubbles or ripples.

At this point, you’ll want to mark where the hole is for the tag. In the end, you’ll punch through the scrapbook paper and you’ll want to easily find where the hole is.

Glue the back down and finish the top edge by folding over the corners towards the back (almost like wrapping a present). When you’re done wrapping the corners, punch holes in your tags.

The final step is to add your letters. I used vinyl letters because they’re easy to use and I love the shine they give.

Time to enjoy your finished project! What was I grateful for the day I took this picture? It was 70+ degrees in the middle of November in St. Louis, Missouri and I did the entire project on my back deck in the SUN! Some of you lucky Californians may not realize what a small miracle that was!

Thank you so much to Kate at Centsational Girl for spotlighting my simple idea. I hope to see some of you on my side of the blogging world more often. Happy Thanksgiving!

Blessings Plate - $8


You will not believe how beautiful this plate looks until you see it in person. Can't you just imagine it at your Thanksgiving feast sitting right behind the pumpkin pie. Mmm...I'm getting hungry as I type! Anyway, we will show you just how easy it can be to make a beautiful personalized plate that is even safe for food. If you need a plate holder, let us know. We can do our best to track one down for you.

Blessings Sign - $12 to $15


This sign gives a gentle reminder to remember the blessings in our lives, especially during this time of year. As with all of our signs, we provide the routered board, sanding materials, paint, hanging materials, and vinyl.

If you sign up for this class up to two weeks before the scheduled date, this project will cost $12! If you let us know less than two weeks before, it will cost $15. So, let us know ASAP when you'd like to attend! As always, if the dates don't work for you and you can gather 5 people together at a different time - let us know! We're happy to come to your home as well.

Sunday, October 4, 2009

Sneak Peek


Here's a sneak peek at one of our November Class ideas - the Joyful Countdown. But don't think we're a one trick pony! Our October ideas are almost ready to unveil. Check back within the next couple of days and we'll have them up!


Thursday, October 1, 2009

Glowing JARckolanterns


Yes, I did come up with the name JARckolanterns. Pretty catchy, right? I can't wait to make these fun little jars for halloween. All you need are old jars, tissue paper, mod podge, black paper (vinyl would make it easier), and white Christmas Lights.

Aren't these adorable? They are pictured on a mantle, but I think they'd look great peeking out the front window at trick-or-treaters.

Thanks to Not So Idle Hands for this great idea!